Cohere
The MongoDB - Cohere Quickstart is a comprehensive, integrated end-to-end technology stack meticulously designed to facilitate the rapid development and seamless deployment of gen AI-powered applications. This innovative framework combines the robust capabilities of MongoDB Atlas for scalable data storage and advanced vector search functionalities with Cohere's state-of-the-art command-r-plus language model and Cohere's re-ranker for powerful natural language processing and retrieval.
Table of Contents
- 1. Overview
- 2. System Architecture
- 3. Components
- 4. Installation & Deployment
- 5. Configuration
- 6. Usage
- 7. Security Considerations
- 8. Monitoring & Logging
- 9. Troubleshooting
- 10. Maintenance & Operations
1. Overview
How to empower leverage semantic search on customer or operational data in MongoDB Atlas. Pass retrieved data to Cohere’s Command R+ generative model for retrieval-augmented generation (RAG). Develop and deploy a RAG-optimized user interface for your app. Create a conversation data store for your RAG chatbot using MongoDB.
Use Case: Develop an advanced chatbot assistant that provides asset managers with information and actionable insights on technology company market reports.
2. System Architecture
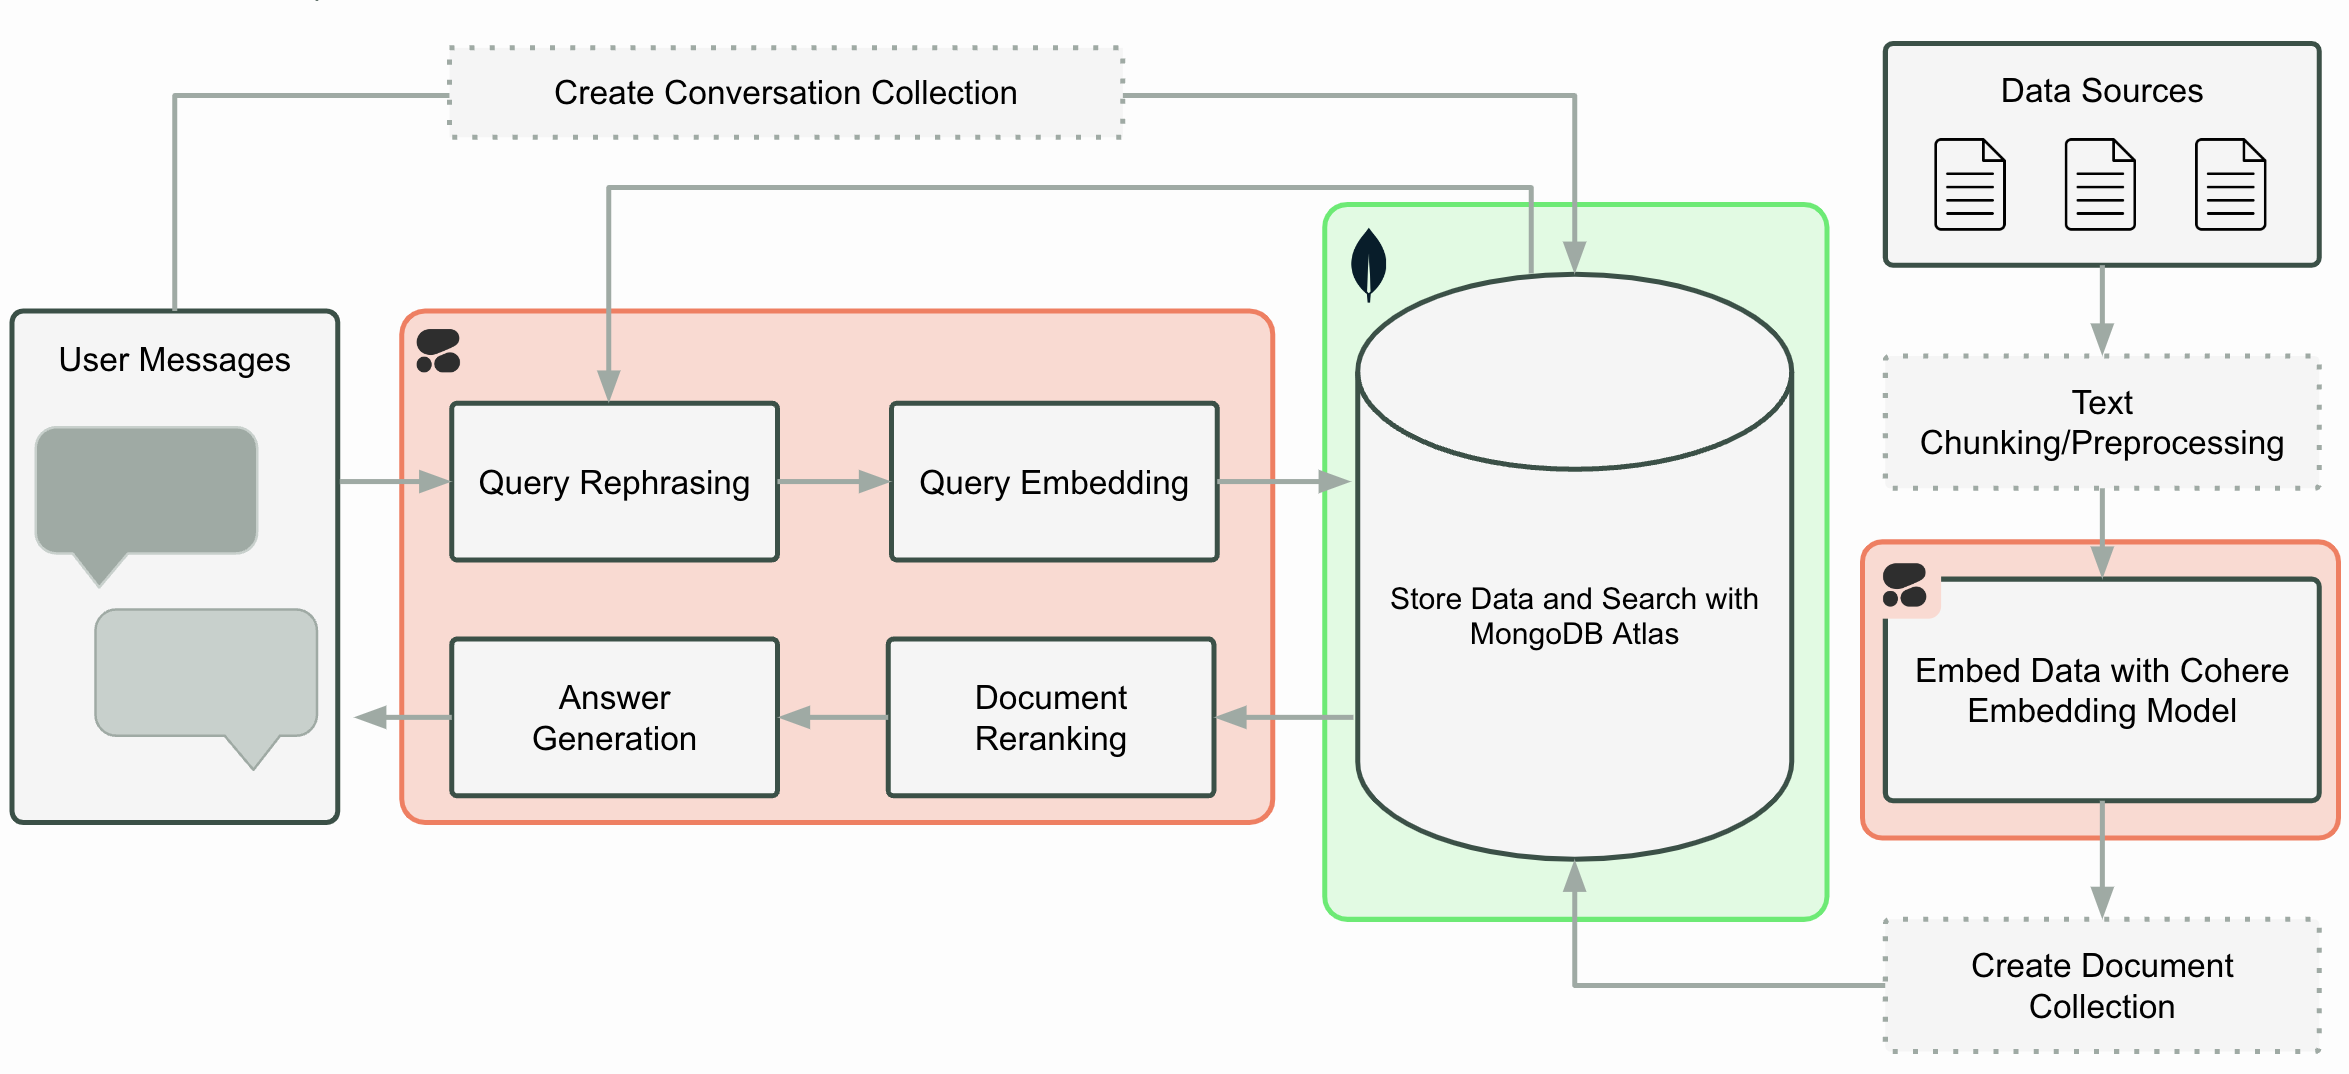
The MAAP architecture consists of several microservices that communicate with each other to process user queries and generate responses:
- UI Service: Provides the web interface for user interaction (Port 8501)
- MongoDB Atlas: Provides vector search and storage capabilities (Ports 27015 to 27017 (TCP))
All services are containerized using Docker and can be deployed together using Docker Compose.
3. Components
3.1 UI Service
The UI Service provides a web-based interface for users to interact with the MAAP system. Built with streamlit it offers:
- A chat interface for sending queries and receiving responses
Key files:
app.py: Contains the streamlit application.backend.py: The functions and business logic for the application.
3.2 MongoDB Management Scripts
Several utility scripts are provided for managing MongoDB Atlas clusters and creating vector indexes:
mongodb_cluster_manager.ksh: Manages MongoDB Atlas cluster deploymentmongodb_atlas_cli.py: Python CLI for MongoDB Atlas operationsmongodb_create_vectorindex.ksh: Creates vector indexes in MongoDB Atlasmongodb_create_vectorindex.py: Python implementation of vector index creation
4. Installation & Deployment
Prerequisites
- AWS account with appropriate permissions
- MongoDB Atlas account with appropriate permissions
- Python 3.10+
- Docker and Docker Compose installed
- AWS CLI installed and configured
- EC2 quota for
t3.xlarge - Programmatic access to your MongoDB Atlas project
MongoDB Atlas Programmatic Access
To enable programmatic access to your MongoDB Atlas project, follow these steps to create and manage API keys securely:
1. Create an API Key
-
Navigate to Project Access Manager:
- In the Atlas UI, select your organization and project.
- Go to Project Access under the Access Manager menu.
-
Create API Key:
- Click on the Applications tab.
- Select API Keys.
- Click Create API Key.
- Provide a description for the key.
- Assign appropriate project permissions by selecting roles that align with the principle of least privilege.
- Click Next.
-
Save API Key Credentials:
- Copy and securely store the Public Key (username) and Private Key (password).
- Important: The private key is displayed only once; ensure it's stored securely.
2. Configure API Access List
-
Add Access List Entry:
- After creating the API key, add an IP address or CIDR block to the API access list to specify allowed sources for API requests.
- Click Add Access List Entry.
- Enter the IP address or click Use Current IP Address if accessing from the current host.
- Click Save.
-
Manage Access List:
- To modify the access list, navigate to the API Keys section.
- Click the ellipsis (...) next to the API key and select Edit Permissions.
- Update the access list as needed.
3. Secure API Key Usage
-
Environment Variables: Store API keys in environment variables to prevent hardcoding them in your application's source code.
-
Access Controls: Limit API key permissions to the minimum required for your application's functionality.
-
Regular Rotation: Periodically rotate API keys and update your applications to use the new keys to enhance security.
-
Audit Logging: Monitor API key usage through Atlas's auditing features to detect any unauthorized access.
By following these steps, you can securely grant programmatic access to your MongoDB Atlas project, ensuring that your API keys are managed and utilized in accordance with best practices.
For more detailed information, refer to Guide.
Minimum System Requirements
- Sufficient CPU and memory for running Docker containers
- Adequate network bandwidth for data transfer and API calls
- For EC2: At least a
t3.mediuminstance (or higher, depending on workload) - Sufficient EBS storage for EC2 instance (at least 100 GB recommended)
- MongoDB Atlas M10 Cluster (auto-deployed by the
one-clickscript)
4.1 One-Click Deployment
The one-click.ksh Korn shell script automates the deployment of the MongoDB - Cohere Quickstart application on AWS infrastructure. It sets up the necessary AWS resources, deploys an EC2 instance, and configures the application environment.
Prerequisites
- AWS CLI installed and configured with appropriate credentials
- Access to a MongoDB Atlas account with necessary permissions
- Korn shell (ksh) environment
Script Structure
The script is organized into several main functions:
create_key(): Creates or uses an existing EC2 key pairdeploy_infra(): Deploys the base infrastructure using CloudFormationdeploy_ec2(): Deploys the EC2 instance and application stackread_logs(): Streams deployment logs from the EC2 instance- Main execution flow
Configuration
Environment Variables
AWS_ACCESS_KEY_ID: AWS access keyAWS_SECRET_ACCESS_KEY: AWS secret keyAWS_SESSION_TOKEN: AWS session token (if using temporary credentials)
Deployment Parameters
INFRA_STACK_NAME: Name for the infrastructure CloudFormation stackEC2_STACK_NAME: Name for the EC2 CloudFormation stackAWS_REGION: AWS region for deploymentEC2_INSTANCE_TYPE: EC2 instance type (e.g., "t3.xlarge")VolumeSize: EBS volume size in GBGIT_REPO_URL: URL of the application Git repositoryMongoDBClusterName: Name for the MongoDB Atlas clusterMongoDBUserName: MongoDB Atlas usernameMongoDBPassword: MongoDB Atlas passwordAPIPUBLICKEY: MongoDB Atlas API public keyAPIPRIVATEKEY: MongoDB Atlas API private keyGROUPID: MongoDB Atlas project ID
Execution Flow
- Initialize logging
- Create or use existing EC2 key pair
- Deploy infrastructure CloudFormation stack
- Retrieve and store infrastructure stack outputs
- Deploy EC2 instance and application CloudFormation stack
- Start streaming EC2 deployment logs
- Monitor application URL until it becomes available
- Launch application URL in default browser
Functions
create_key()
Creates a new EC2 key pair or uses an existing one with the name "MAAPCohereKeyV1".
deploy_infra()
Deploys the base infrastructure CloudFormation stack, including VPC, subnet, security group, and IAM roles.
deploy_ec2()
Deploys the EC2 instance and application stack using a CloudFormation template. It includes the following steps:
- Selects the appropriate AMI ID based on the AWS region
- Creates the CloudFormation stack with necessary parameters
- Waits for stack creation to complete
- Retrieves and displays stack outputs
read_logs()
Establishes an SSH connection to the EC2 instance and streams the deployment logs in real-time.
Logging
- Main deployment logs:
./logs/one-click-deployment.log - EC2 live logs:
./logs/ec2-live-logs.log
Error Handling
The script includes basic error checking for critical operations such as CloudFormation stack deployments. If an error occurs, the script will log the error and exit.
Security Considerations
- AWS credentials are expected to be set as environment variables
- MongoDB Atlas credentials and API keys are passed as CloudFormation parameters
Customization
To customize the deployment:
- Modify the CloudFormation template files (
deploy-infra.yamlanddeploy-ec2.yaml) - Adjust the deployment parameters at the beginning of the script
- Update the AMI IDs in the
ami_mapif newer AMIs are available
Troubleshooting
- Check the log files for detailed information on the deployment process
- Ensure all required environment variables and parameters are correctly set
- Verify AWS CLI configuration and permissions
- Check CloudFormation stack events in the AWS Console for detailed error messages
Limitations
- The script is designed for a specific application stack and may require modifications for other use cases
- It assumes a certain MongoDB Atlas and AWS account setup
- The script does not include rollback mechanisms for partial deployments. In case of partial failures, delete the related CloudFormation stacks from AWS Console.
Deployment Steps
-
Clone the repository:
git clone <repository-url>
cd maap-cohere-qs -
Configure the
one-click.kshscript: Open the script in a text editor and fill in the required values for various environment variables:- AWS Auth: Specify the
AWS_REGION,AWS_ACCESS_KEY_ID,AWS_SECRET_ACCESS_KEYfor deployment. - EC2 Instance Types: Choose suitable instance types for your workload.
- Network Configuration: Update key names, subnet IDs, security group IDs, etc.
- Authentication Keys: Fetch Project ID, API public and private keys for MongoDB Atlas Cluster setup. Update the script file with the keys for
APIPUBLICKEY,APIPRIVATEKEY,GROUPIDsuitably.
- AWS Auth: Specify the
-
Deploy the application:
chmod +x one-click.ksh
./one-click.ksh -
Access the application at
http://<ec2-instance-ip>:8501
Post-Deployment Verification
- Access the UI service by navigating to
http://<ec2-instance-ip>:8501in your web browser. - Test the system by entering a query and verifying that you receive an appropriate AI-generated response.
- Verify that the sample dataset bundled with the script is loaded into your MongoDB Cluster name
MongoDBCohereV1under the databaseasset_management_use_caseand collectionmarket_reportsby visiting the MongoDB Atlas Console.
5. Configuration
5.1 Environment Variables��
Each service requires specific environment variables for proper operation:
Main Service:
MONGODB_URI="mongodb+srv://username:password@cluster.mongodb.net/?retryWrites=true&w=majority"
AWS_ACCESS_KEY_ID="your-aws-access-key"
AWS_SECRET_ACCESS_KEY="your-aws-secret-key"
AWS_REGION="us-east-1"
COHERE_API_KEY="xxxxxxxx"
6. Usage
6.1 User Interface
The MAAP UI is accessible via a web browser at http://[server-ip]:8501. The interface includes:
- User ID Field: Enter a unique identifier to associate uploaded documents and conversation history
- Tools Selection: Choose which search tools to use (MongoDB Hybrid Search, Web Search)
- Chat Interface: Enter queries and view AI responses
- File Upload: Attach documents to be processed and included in the knowledge base
6.2 Querying the System
To query the system:
- Enter your User ID to retrieve personalized content
- Type your query in the chat input field
- Select the desired tools (MongoDB Hybrid Search, Web Search)
- Submit the query
The system will:
- Check the semantic cache for similar previous queries
- Retrieve relevant conversation history from AI Memory
- Route the query to appropriate specialized agents
- Generate a response based on the available information
- Save the conversation to memory for future context
7. Security Considerations
To enhance the security of your AWS EC2 instances and MongoDB Atlas integration, consider the following configurations and best practices:
Network and Firewall Configuration
MongoDB Atlas:
-
IP Access List:
- Restrict client connections to your Atlas clusters by configuring IP access lists.
- Add the public IP addresses of your application environments to the IP access list to permit access.
- For enhanced security, consider using VPC peering or private endpoints to allow private IP addresses.
- Configure IP Access List Entries.
-
Ports 27015 to 27017 (TCP):
- Ensure that your firewall allows outbound connections from your application environment to Atlas on ports 27015 to 27017 for TCP traffic.
- This configuration enables your applications to access databases hosted on Atlas.
Authentication and Authorization
-
Database Users:
- Atlas mandates client authentication to access clusters.
- Create database users with appropriate roles to control access.
- Configure Database Users.
-
Custom Roles:
- If default roles don't meet your requirements, define custom roles with specific privileges.
- Create Custom Roles.
-
AWS IAM Integration:
- Authenticate applications running on AWS services to Atlas clusters using AWS IAM roles.
- Set up database users to use AWS IAM role ARNs for authentication.
- AWS IAM Authentication.
Data Encryption
-
Encryption at Rest:
- Atlas encrypts all data stored on your clusters by default.
- For enhanced security, consider using your own key management system.
- Encryption at Rest.
-
TLS/SSL Encryption:
- Atlas requires TLS encryption for client connections and intra-cluster communications.
- Ensure your applications support TLS 1.2 or higher.
- TLS/SSL Configuration.
Network Peering and Private Endpoints
-
VPC Peering:
- Establish VPC peering between your AWS VPC and MongoDB Atlas's VPC to eliminate public internet exposure.
- Set Up a Network Peering Connection.
-
Private Endpoints:
- Use AWS PrivateLink to create private endpoints for secure communication within AWS networks.
- Configure Private Endpoints.
-
NAT Gateway:
- Use NAT Gateways to route traffic from private subnets while preventing direct internet access to EC2 instances.
-
Specific IP Ranges:
- AWS services like Bedrock use dynamic IPs. Filter these from AWS IP Ranges for egress traffic.
Compliance and Monitoring
-
Audit Logging:
- Enable audit logging to monitor database activities and ensure compliance with data protection regulations.
- Enable Audit Logging.
-
Regular Updates:
- Keep your dependencies and Docker images up to date to address security vulnerabilities.
By implementing these configurations and best practices, you can enhance the security, efficiency, and compliance of your integration between AWS resources and MongoDB Atlas.
8. Monitoring & Logging
The MAAP system includes a comprehensive logging solution:
-
Centralized Logging:
- All services log to the Logger Service
- Logs are stored in both files and MongoDB
-
Log Levels:
- DEBUG: Detailed debugging information
- INFO: General operational information
- WARNING: Warning events
- ERROR: Error events
- CRITICAL: Critical events
-
Log Retention:
- File logs are rotated daily and retained for 10 days
- MongoDB logs have a TTL index for automatic cleanup
-
Monitoring:
- Service health can be monitored via the Logger Service
- MongoDB Atlas provides monitoring for database operations
To access logs:
- View log files in the
logsdirectory of each service - Query the
event_logs.logscollection in MongoDB
9. Troubleshooting
Common issues and solutions:
-
Connection Issues:
- Problem: Services cannot connect to MongoDB
- Solution: Verify MongoDB URI, network connectivity, and whitelist IP addresses
-
Vector Index Errors:
- Problem: Vector search fails
- Solution: Run
mongodb_create_vectorindex.kshto recreate indexes
-
Docker Compose Issues:
- Problem: Services fail to start
- Solution: Check logs with
docker-compose logsand ensure environment variables are set
-
Slow Response Times:
- Problem: System responses are slow
- Solution: Increase service replicas, check MongoDB performance, optimize vector indexes
10. Maintenance & Operations
Regular Maintenance Tasks
-
Database Management:
- Monitor MongoDB Atlas metrics for performance issues
- Review and optimize indexes periodically
- Set up alerts for storage capacity
-
Log Rotation:
- Verify log rotation is working correctly
- Adjust TTL settings if logs grow too large
-
Security Updates:
- Regularly update Docker images
- Apply security patches to dependencies
- Rotate AWS and MongoDB credentials
-
Scaling:
- Monitor resource usage and scale services as needed
- Adjust replica counts in docker-compose.yml
- Consider MongoDB Atlas tier upgrades for larger datasets
Backup and Recovery
-
MongoDB Backups:
- MongoDB Atlas provides automated backups
- Configure backup schedule in Atlas console
- Test restoration process periodically
-
Configuration Backup:
- Back up environment files
- Document any custom configurations
- Store backup copies securely
-
Disaster Recovery:
- Document recovery procedures
- Test recovery process periodically
- Maintain deployment scripts for quick rebuilding
Performance Optimization
-
MongoDB Performance:
- Use appropriate Atlas tier for workload
- Monitor and optimize indexes
- Configure read/write concerns appropriately
-
Service Scaling:
- Adjust service replicas based on load
- Monitor container resource usage
- Consider horizontal scaling for high-traffic deployments
-
Caching Strategy:
- Tune semantic cache thresholds
- Adjust TTL settings for optimal cache hit rates
- Monitor cache effectiveness and adjust as needed